Authenticating users with Azure AD
Working with an environmental think tank, I created a Wagtail intranet which authenticates users against Azure Active Directory.
Configuring Wagtail to restrict content
There are a few options you can choose to authenticate against Azure Active Directory with Django. However, for this task I opted to use social-auth-app-django. I chose this package for its ability to alter the authentication pipeline easily and so I could add in a custom step.
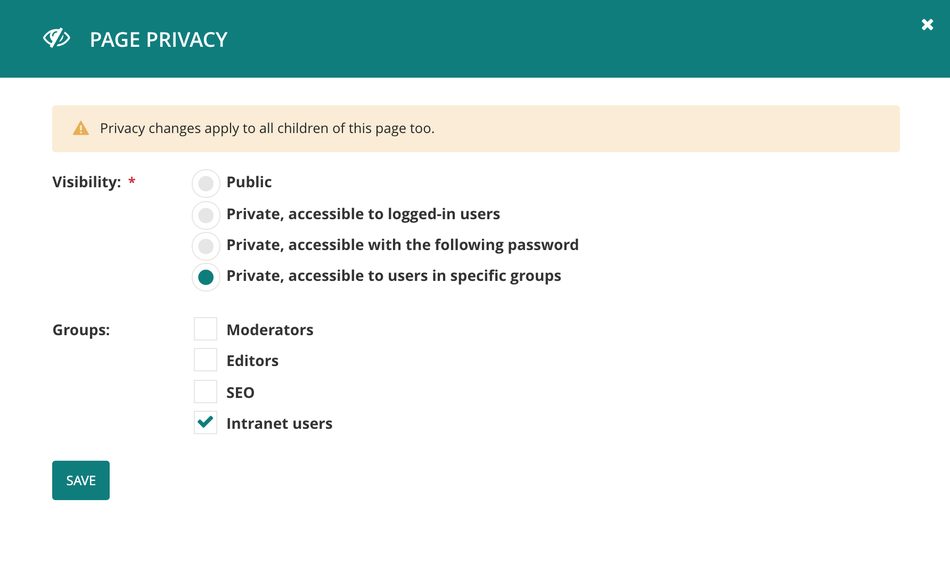
For my specific use case, I want to grant access to content depending on whether the current user is authenticated via Azure AD. To accomplish this, we can use the Wagtail page privacy configuration, by setting the considered content to "Private, accessible to users in specific groups”. We then need to add a group to which we can then assign to users that authenticate through Azure AD. First we can create a new group in the Wagtail admin at /admin/groups/. Selecting the parent page for the content I want to restrict, I mark it "Private, accessible to users in specific groups", choosing the group that I have previously created.
Authenticating users from Azure AD
Now that Wagtail is restricting content, we need to get our site to talk to the Azure Active Directory. Add social-auth-app-django to the projects requirements, along with its own requirements, as listed here.
Now we can start to configure the project to talk with Azure AD following these steps and then the Azure AD Tenant steps, before adding the following to our application settings:
# settings.py
...
AUTHENTICATION_BACKENDS = [
    ...
    'social_core.backends.azuread_tenant.AzureADTenantOAuth2',
]

TEMPLATES = [
    {
        ...
        'OPTIONS': {
            'context_processors': [
                ...
                # Social auth context_processors
                'social_django.context_processors.backends',
                'social_django.context_processors.login_redirect',
            ],
            ...
        },
    },
]

# Social Auth settings.
SOCIAL_AUTH_AZUREAD_TENANT_OAUTH2_KEY = 'OAUTH2_KEY'
SOCIAL_AUTH_AZUREAD_TENANT_OAUTH2_SECRET = 'OAUTH2_SECRET'
SOCIAL_AUTH_AZUREAD_TENANT_OAUTH2_TENANT_ID = 'OAUTH2_TENANT_ID'
SOCIAL_AUTH_ADMIN_USER_SEARCH_FIELDS = ['username', 'first_name', 'last_name', 'email']
SOCIAL_AUTH_POSTGRES_JSONFIELD = True
You should also add the following to the login page template.
# path/to/login.html
...
<a href="{% url "social:begin" "azuread-tenant-oauth2" %}">Azure AD login</a>
If you don’t currently have a login page template, you can define the template you want to use by adding the WAGTAIL_FRONTEND_LOGIN_TEMPLATE setting to your app.
At this stage we are now able to log in to Django using Azure AD. However, our user is not able to access the restricted content yet as they are not a member of our new group. To fix this we need to add a step to the end of the authentication pipeline.
I have created a file called `pipeline.py` inside my `users` app in the project:
# pipeline.py
from django.contrib.auth.models import Group


def make_intranet_user(backend, user, response, *args, **kwargs):
    intranet_group = Group.objects.get_or_create(name='Intranet users')
    user.groups.add(intranet_group)
This simple function will find the group that I created earlier, and add the user that has just been created to that group.
We now need to add this to the pipeline by altering the default setting for SOCIAL_AUTH_PIPELINE.
#settings.py
...
SOCIAL_AUTH_PIPELINE = (
    'social_core.pipeline.social_auth.social_details',
    'social_core.pipeline.social_auth.social_uid',
    'social_core.pipeline.social_auth.auth_allowed',
    'social_core.pipeline.social_auth.social_user',
    'social_core.pipeline.social_auth.associate_by_email',
    'social_core.pipeline.user.create_user',
    'social_core.pipeline.social_auth.associate_user',
    'social_core.pipeline.social_auth.load_extra_data',
    'social_core.pipeline.user.user_details',
    # New pipeline item.
    'project.users.pipeline.make_intranet_user',
)
As seen above we simply add the default pipeline items and then append our new item to the end. I recommend that you read through what each item in the pipeline is doing and make sure you add/remove items depending on the needs of your project.
Now you should see that when you authenticate a user using Azure AD, the user will be created and assigned to the defined group.
Cleaning up the user's journey
The user journey is currently:
- Anonymous user tries to access protected content
- The user is redirected to the login page
- The user selects to log in with Azure AD
- Azure AD authentication
- Redirected back to the site
- The now logged in user is able to see the protected content
This could be tidied up; for my use case, the only people that will see this login page are people that want to log in with their Microsoft Credentials. This means that we can skip the Wagtail login page and redirect them straight to the Azure authentication page. We need to create a new login view that will perform the redirect:
# views.py
from django.http import HttpResponseRedirect
from django.urls import reverse

def login_view(request):
    return HttpResponseRedirect(reverse('social:begin', args=['azuread-tenant-oauth2']))
# urls.py
from project.login.views import login_view
...
urlpatterns = [
    ...
    path('accounts/login/', login_view),
		...
]
# settings.py
...
WAGTAIL_FRONTEND_LOGIN_URL = '/accounts/login'
...
If you only want to be redirected in certain scenarios then you can return HttpResponseRedirect(reverse('wagtailcore_login')) to view the Wagtail login page. Now our user journey looks like this:
- Anonymous user tries to access protected content
- The user is redirected to Azure AD and asked to login and authorise the app.
- Redirected back to the site
- The now logged in user is able to see the protected content
Things to consider
- The code in the pipeline.py will add any user authenticated through a social_auth to the new group, if you intend on using multiple authentication methods but only want users from Azure AD to be added to your group, you will need to alter the pipeline step to verify which backend was used.
- When setting up your Application in Azure AD, make sure to add the specific “reply URLs” otherwise you will hit issues with Azure not wanting to redirect you back to the site once the user has been authenticated. The reply URL should be something like https://example.com/complete/azuread-tenant-oauth2/. This has to be running on HTTPS as Azure AD won’t allow you to enter a reply URL beginning with http://.
- In the custom pipeline step, you might want to consider loading the Group by an ID instead of its name, this could then be set as a project setting and will reduce the risk of access failing due to the wrong group being used.